A Guide to Passing Data Using Props in React
A practical guide in passing data effectively and effortlessly into react components by using props.

I am a backend developer who is also interested in technical writing and open-source development. I am very open to collaboration, mentorship, and internship roles.
Introduction
The React library is very popular for its ability to build dynamic user interfaces. In your journey of learning React, you will encounter the concept of Components and how they communicate. Think of components as the foundation on which react user interfaces are built.
In this tutorial, you will learn about:
React and its Component.
The concept of props and data transfers between React Components.
Effective components communicate using props.
All code examples can be accessed here
Prerequisites.
Basic knowledge of JavaScript ES6 syntax.
Basic command line knowledge.
Basic knowledge of HTML.
Nice to have:
- Basic React knowledge.
React and Its Components
What is React?
React is an open-source front-end JavaScript library containing reusable functions used for creating dynamic user interfaces. Created by Facebook in 2013, it has become the most widely-used front-end framework.
What is a React Component?
React components are isolated blocks of functions used to implement specific functionalities and build user interfaces. To achieve the dynamic state required, they need to receive data to interact with themselves. They can be created and updated by the developer. Updating the component model updates the user browser. Think of a component model as a tree with a component at the top. The component at the top is called the root/parent component.
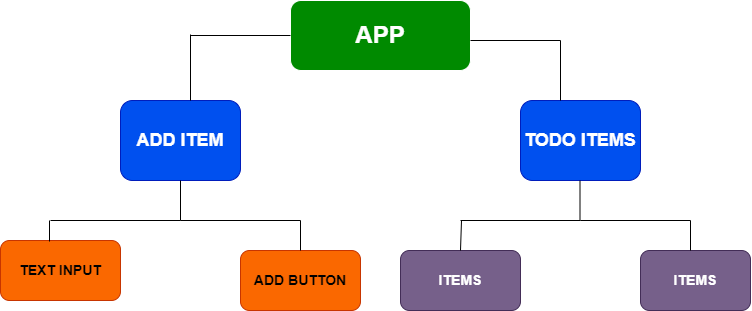
The diagram above represents a simple Todo list component tree structure.
The App component at the top represents the root/parent component. It oversees everything. It contains two children components: Add Item and Todo Items.
The Add Item contains two components: Text-Input- a text field where you can write a new item, and Add Button - a button that adds what you have written to your Todo list.
The Todo items also contain two components. The components are the Todo list items added. Note that it could be more than two in this case.
When you click on a button, events happen at a component and they can affect other parts of the codebase. For instance, when the Add Button is clicked, it tells the App component to add a new task. The text entered is sent to the Todo Items through the App component. This action adds a new item, and then the UI updates as the component changes.
In conclusion, React components are building blocks that help us create dynamic websites and applications. They work together to ensure the application displays and functions well.
Why do we need to Pass Data between Components?
React relies majorly on its component model. But how will these components be reactive to each other? For instance, from the example above, how will the Add Button component know that data should be sent to the Todo Items component when an event is triggered? Here is where the passing of data comes in. It is a crucial aspect of building efficient and dynamic user interfaces. It enables you to build complex UIs that can be made simpler by creating reusable and modular components.
Understanding Props in React
To use Props effectively, it is important to understand how it works, including how it is used to pass data between components.
The Concept of props in React
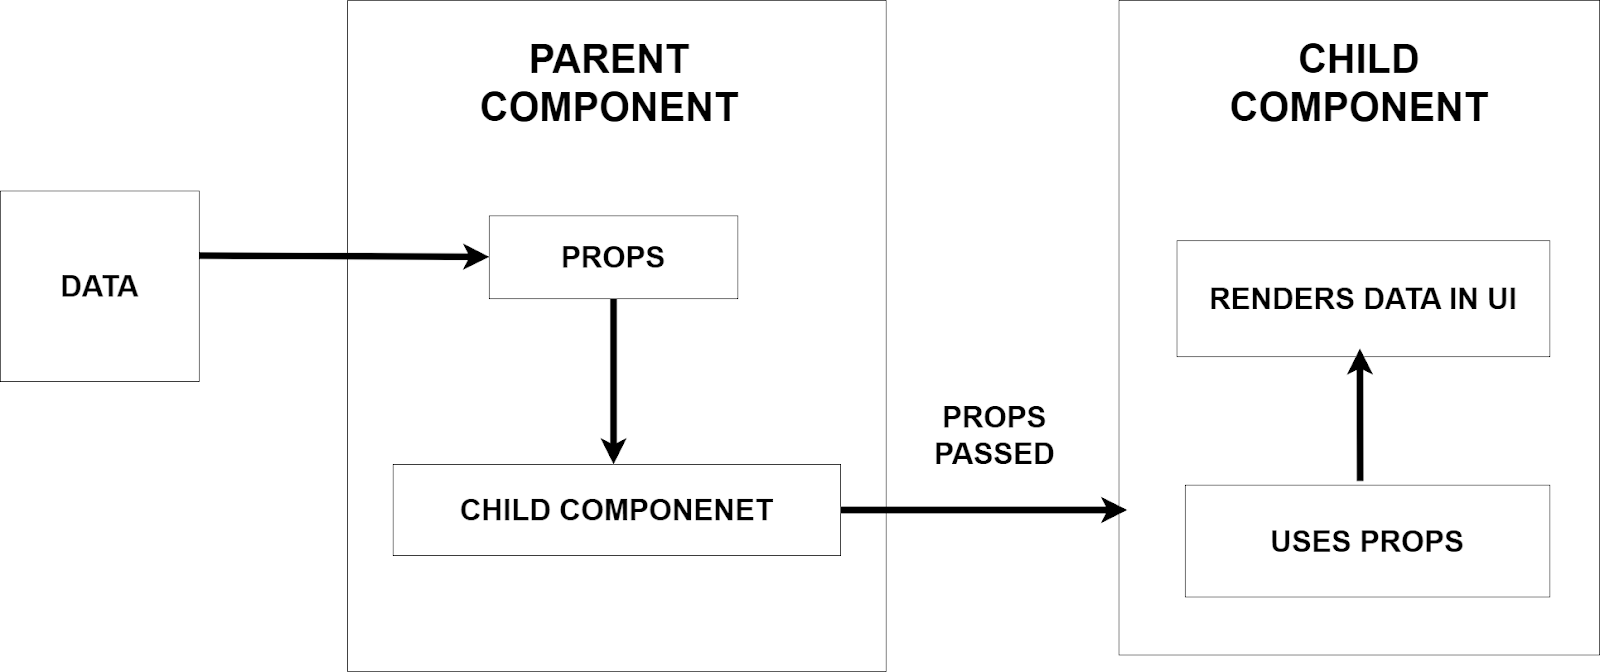
Props(properties) is a technique of passing data from one component to another. With props, the parent component can share data with the child component. The child component then renders this data to the UI.
Props are immutable. When passed to the child component, they can’t be updated but can still be accessed and used. This attribute helps maintain a clear separation between parent and child components.
How do props fit into the data flow in React?
In React, data flows in a unidirectional manner. It travels from the parent component to the child component only. Here is a step-by-step process of how data flows in React components.
Data flow starts from the parent component. This data can be from an API
The data in the parent component is transferred to its child component by props.
The child component receives, accesses, and uses the data. Here is where the data consumption takes place. The data is rendered as UI elements or for other functions.
The data is then dynamically rendered as content on the UI. It is interpolated with Javascript XML(JSX) to display the data as an output on the screen.
Data changes in the parent component result in new data inflow to the child component, making the application re-render.
Since data flow is unidirectional, the flow stops at the child component.
Transferring Data from Parent to Child Component
As discussed, passing data between components is an essential feature in React. To master it, start by making a simple React application with the Vite tool in your terminal and type in npm create vite@latest reactProps -- --template react.
Navigate to the directory with this command cd reactProps.
Next is to install all the dependencies by executing this command npm install.
The file tree should look like this.

Creating Components
Firstly, open the App.jsx file in the src folder and replace the code there with the one below. All code examples will run on this file.
src/App.jsx
const App = () => {
  return (
    <div>
      <p>Hello world</p>
    </div>
  )
}
export default App
This code defines a functional React component named App. This component renders a div containing an h1 element with the text Hello world and a p element with the text I am a React Component. To make it available in other parts of the codebase, the file must be exported.
In the src folder's main.jsx file, the following code block imports the App component from the App.jsx file and renders the content of the App component in the div element with the id value of root defined in the public/index.html.
import React from 'react'
import ReactDOM from 'react-dom/client'
import App from './App.jsx'


ReactDOM.createRoot(document.getElementById('root')).render(
  <React.StrictMode>
    <App />
  </React.StrictMode>,
)
Here is what the code outputs.

You can remove App.css and index.css files from the project folder since all code examples are executed on the src/App.jsx file.
Passing Props to a Component
To begin, import propTypes from the 'prop-types' library. This library ensures that the correct type of props are passed to a component.
Afterward, build a component named Message that will accept a prop named greeting and display a message within it. Using the return statement, tell the component what to render.
Finally, indicate that the greeting component can accept any React node and make it a requirement when employing the Message component. A React node can be a variety of things, such as a string, number, JSX, and more.
src/App.jsx
import propTypes from 'prop-types'


const Message = (props) => {
  return (
    <div>
      <p>{props.greeting}</p>
    </div>
  )
}


Message.propTypes = {
  greeting: propTypes.node.isRequired
}
In the src/App.jsx file, replace the code inside the div element with the code below in the App component.
<Message greeting="Greetings from the Child Component" />
Here is what the code outputs.

Destructuring Props Object
The JavaScript ES6 destructuring syntax can extract specific props from the props object. Here, the name and age props are directly removed.
src/App.jsx
const Profiles = ({ name, age }) => {
  return (
    <div>
      <p>
        Hello {name}. Your age is {age}
      </p>
    </div>
  )
}

Profiles.propTypes = {
  name: propTypes.node.isRequired,
  age: propTypes.node.isRequired
}
Replace the code inside the div element in the parent component with the code below.
src/App.jsx
<Profiles name={name} age={age} />
Setting Default Value for a Prop
Default values can be set to props in the child component, providing a fallback when nothing is specified. For instance, in the Profile component, you can set a default value of "John Doe" to the name prop. If not defined, the name prop will assume the value of "John Doe". Check out the code below for an example of how this works.
src/App.jsx
const Profiles = ({ name = 'John Doe', age }) => { …
}
Propagate Props with JSX Spread Syntax
JSX spread syntax is a technique for passing properties from parent and child components. This involves the parent component collecting and spreading the properties to the child component. You will examine this technique in the example below.
Firstly, import the PropTypes module from the prop-types package. It defines the expected type of prop for the component.
Then create a Component named Avatar that receives a prop and displays information about a person. The received prop object is broken down into the person prop. Then, the div element in the component gets displayed on the screen.
Finally, for this component, assign a propTypes property to it. This property confirms the incoming person prop. The person prop can be of various types and is required when the component is being utilized.
src/App.jsx
import PropTypes from "prop-types"


const Avatar = (props) => {
  const { person } = props


  return (
    <div>
      <p>Name: {person.name}</p>
      <p>Age: {person.age}</p>
      <p>Occupation: {person.occupation}</p>
      <p>Country: {person.country}</p>
    </div>
  )
}

Avatar.propTypes = {
  person: PropTypes.node.isRequired,
}
Create a new component called Profile. This component will receive the prop and display the Avatar component using the spread syntax instead of passing individual items to be displayed separately.
src/App.jsx
function Profile(props) {
  return (
    <div>
      <Avatar {...props} />
    </div>
  )
}
To complete this setup, it is necessary to create the final component named App. This component defines an object that includes the avatarProps object with multiple properties. The App component displays the Profile component that accepts the avatarProps through the spread syntax.
Always remember to export the parent component to ensure proper functionality.
export default App
Here is what the code outputs.

In the example above, the spread syntax was used twice. This syntax allows all props received to be passed from the Profile component to the Avatar Component at once, eliminating the need to list them individually.
The avatarProps object is passed to the Profile component using the spread syntax with its properties being transferred as separate props to the Profile component. This approach offers the benefit of forwarding all props from the top component (i.e., the App component) to the Avatar component.
Passing JSX as Children Prop
To render JSX content within a component, JSX is used as a child prop. It is placed between the opening and closing tags of the component, and it is treated as dynamic content by the component's rendering logic.
To implement this, create a component named Modalthat uses the children prop to receive and render JSX content passed between its tags. Note that the children must be provided when using the Modal component. It is necessary to import PropTypes for this purpose.
src/App.jsx
import PropTypes from "prop-types"


const Modal = ({ children }) => {
  return <div>{children}</div>
}


Modal.propTypes = {
  children: PropTypes.node.isRequired,
}
The Modal component is rendered by the App component with JSX elements defined between its opening and closing tags.
src/App.jsx
const App = () => {
  return (
    <div>
      <Modal>
        <h2>Welcome to the Modal!</h2>
        <p>This is some content within the modal.</p>
      </Modal>
    </div>
  )
}

export default App
Here is what the code outputs.

Conclusion.
This guide introduced you to the world of React Components and the role they play in displaying dynamic user interfaces. You were introduced to the world of props and clarified the concept behind it.
Understanding how info and data are passed between parent and child components will come in handy in your React mastering journey. It gets more intricate than this going forward, so brace yourselves.
The good news is that it builds upon the foundation already treated in this guide. What would you like to learn about next? Let me know in the comments.
Found this article helpful?
Feel free to find me around the web for questions and clarifications.
Thanks for reading to the end.


